![[Updated] Unlocking Personalized Vocal Elements on Instagram](https://thmb.techidaily.com/61dcd74c9ca257bd7a3583ce0e08424eaf979002cdc0aa0e847be271477f189f.jpg)
[Updated] Unlocking Personalized Vocal Elements on Instagram
Unlocking Personalized Vocal Elements on Instagram
Instagram Stories and Reels are a great way to tell everyone you know about your whereabouts. Stories and Reels are useful for companies and brands to talk about their latest products, services, offers, and more to better engage with their customers. These two features also allow influencers to update followers about their upcoming videos. But do you know about the latest feature of Instagram in 2021?
Instagram has rolled out a creative voice changer option for both Stories and Reel. If you are new to the Instagram voice changer feature and want to learn how it works, we have got you covered. Using the voice changer effect will change the way you have been uploading Stories and Videos. It’s entertaining.
In this article
01 Change Your Voice on Instagram Story
02 Types of Instagram Voice Filters
03 Change Voice in Instagram Reel
04 Change Instagram Video Voice on Desktop with Filmora
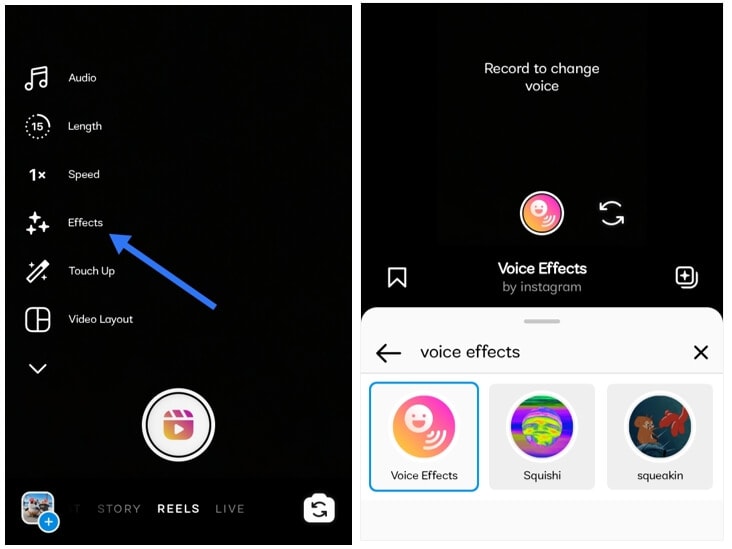
## Part 1: How to Change Your Voice on Instagram Story? \[Step by Step\]Before you find out how to use the voice changer for Instagram, you need to first log in to your mobile Instagram account. Once you have done that, go through the steps that we have mentioned below:
Step 1: First, you need to click on your profile picture with the + sign. Once the camera opens up, click on the Story option.
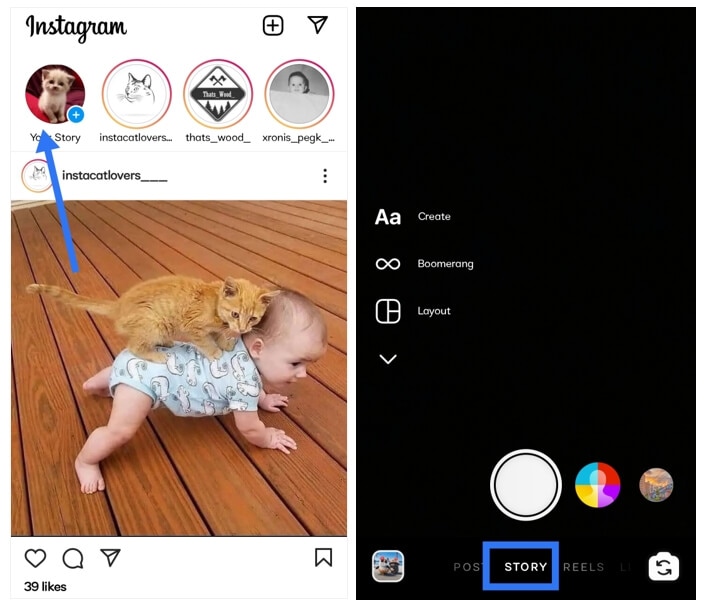
Step 2: You need to browse through the filters and click on the search option, and then search for Voice Effects.
 Software Update Pro - Check and update software installed on your computer.
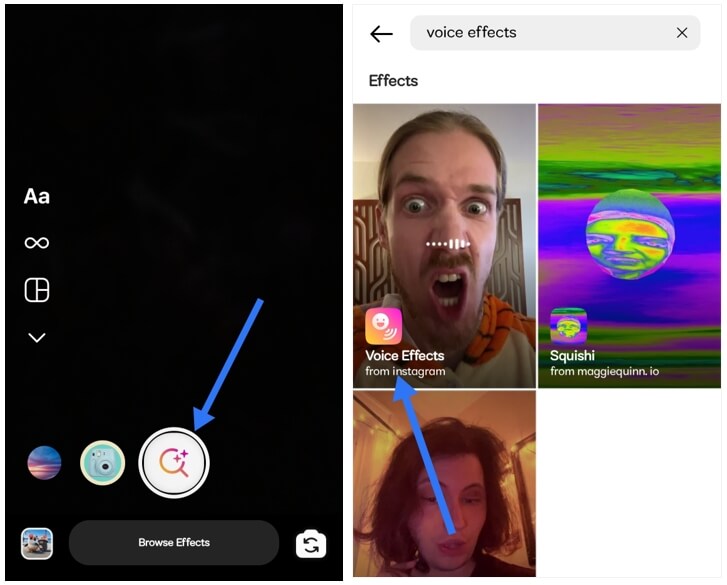
Step 3: You will see the Voice Effects option. The filter icon will be pink. Please click on that. The Voice Effect filter will be added, and then you can start recording a story.

WPS Office Premium ( File Recovery, Photo Scanning, Convert PDF)–Yearly
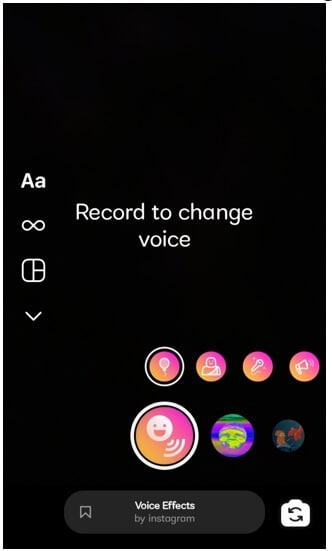
Preview your story, and you will see that your voice has been changed to the chosen Voice Effect. And that’s how you will use the Instagram voice changer filter.
Find out more interesting usage of Instagram Stories .
 Forex Robotron Basic Package
Part 2: Types of Instagram Voice Filters
There are five voice filters available. Each of them is unique, and depending on your mood and requirements, you can pick a voice filter.
Helium: The first voice filter is helium. It makes your voice sound as if you have inhaled the helium gas. As a result, your voice will sound squishy and cute.
Giant: If you love a giant voice, try the giant voice because it will make you sound completely different!
Vocalist: The vocalist filter makes your voice sound incredibly soothing and melodic. If you like soft voice, this is the filter to go for.
Announcer: The announcer filter will let you speak like a real announcer. It has echo effects too!
Robot: The last one is the robot filter, where you will sound like a robot. This one makes you sound like you are from outer space.
 Forex Robotron Gold Package
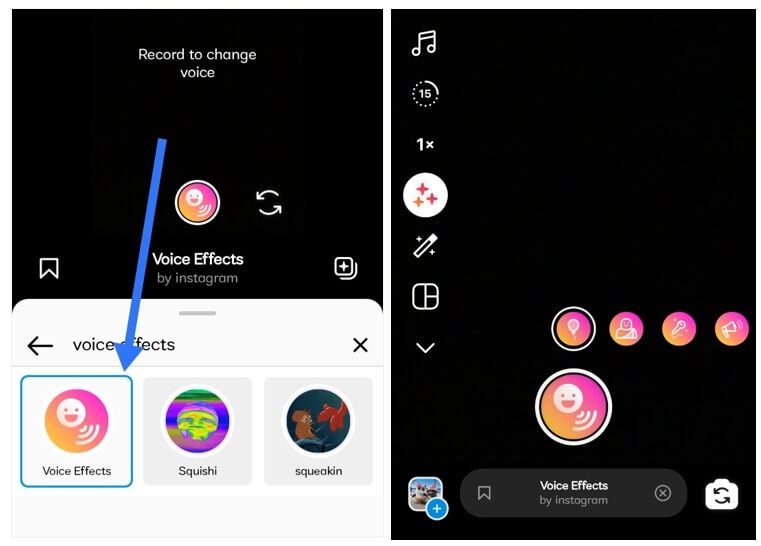
Part 3: How to Change Voice in Instagram Reel?
Just like you can change your voice when filming a story, you can try the same voice-changing filter while recording a reel. Since Reels stay on your account, it makes sense to transform your usual reels into something extraordinary, and the voice changer effect helps you achieve that impeccably. Here’s what you need to do:
Step 1: Go to your Instagram account and click on your profile picture with the + icon. And then click on the Reels option.

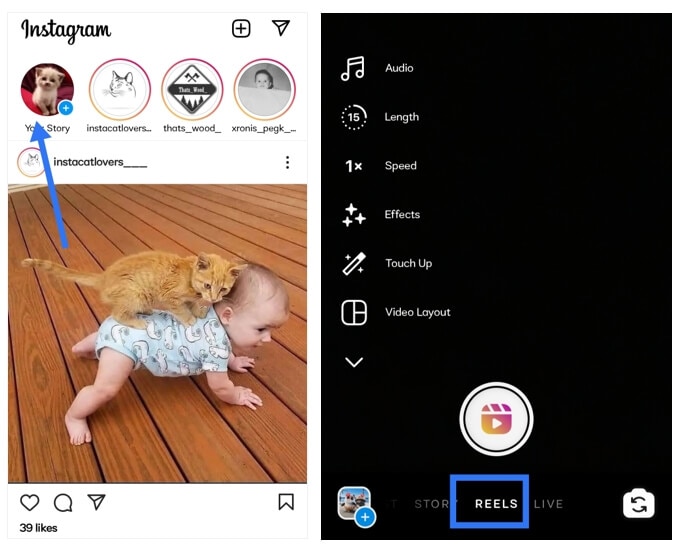
Step 2: On your left, you will see the filter option; please click on that. When the filters appear, look at the top of the filters, and you will see a search bar. There, you need to type voice effects.

Step 3: The voice effects filter will appear. Please click on that. Once done, record your reel like you usually do and preview it to listen to your changed voice.
Part 4: How to Change Instagram Video Voice on Desktop with Filmora?
For Win 7 or later (64-bit)
For macOS 10.12 or later
There is another way to change Instagram video voice, and that is by using a trustworthy third-party application like Filmore by Wondershare. This professional video editing tool will let you change your voice efficiently. Furthermore, Filmora ensures to make the entire process of voice change easy and convenient. This means, even if you are not a professional video editor, you can still use Filmora to change your voice just the way you want. Here’s the step that you need to follow:
Step 1: Add Videos with Voiceover or Add a Voiceover to a Video

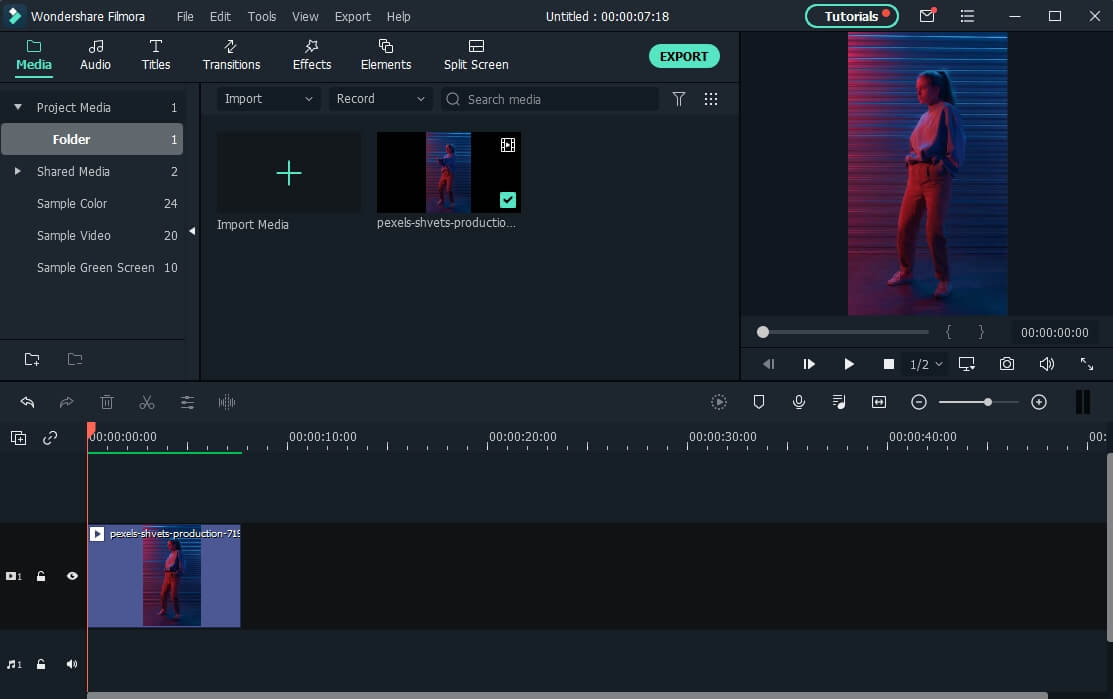
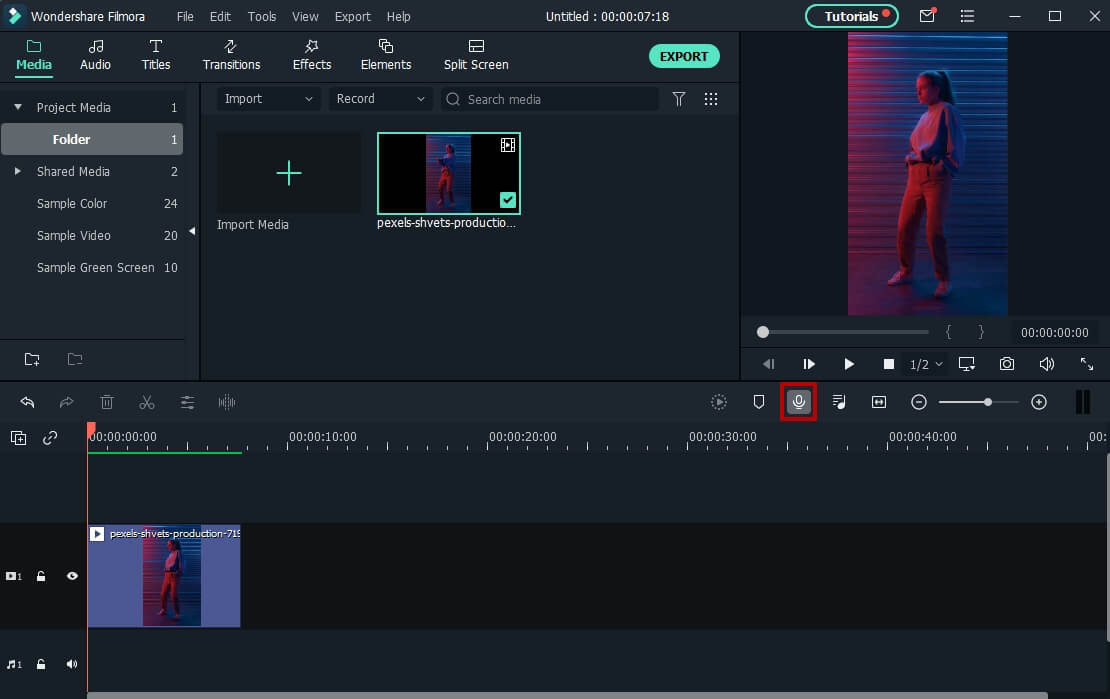
Launch Wondershare Filmora on your desktop, and then click the New Project to start a new one. Next, click on the import option to add the video/audio file. Or you can use the music tracks in the Audio library.
Filmora also allows you to record voiceover and change the voice later, you can click on the voiceover option that you can see above the Timeline.
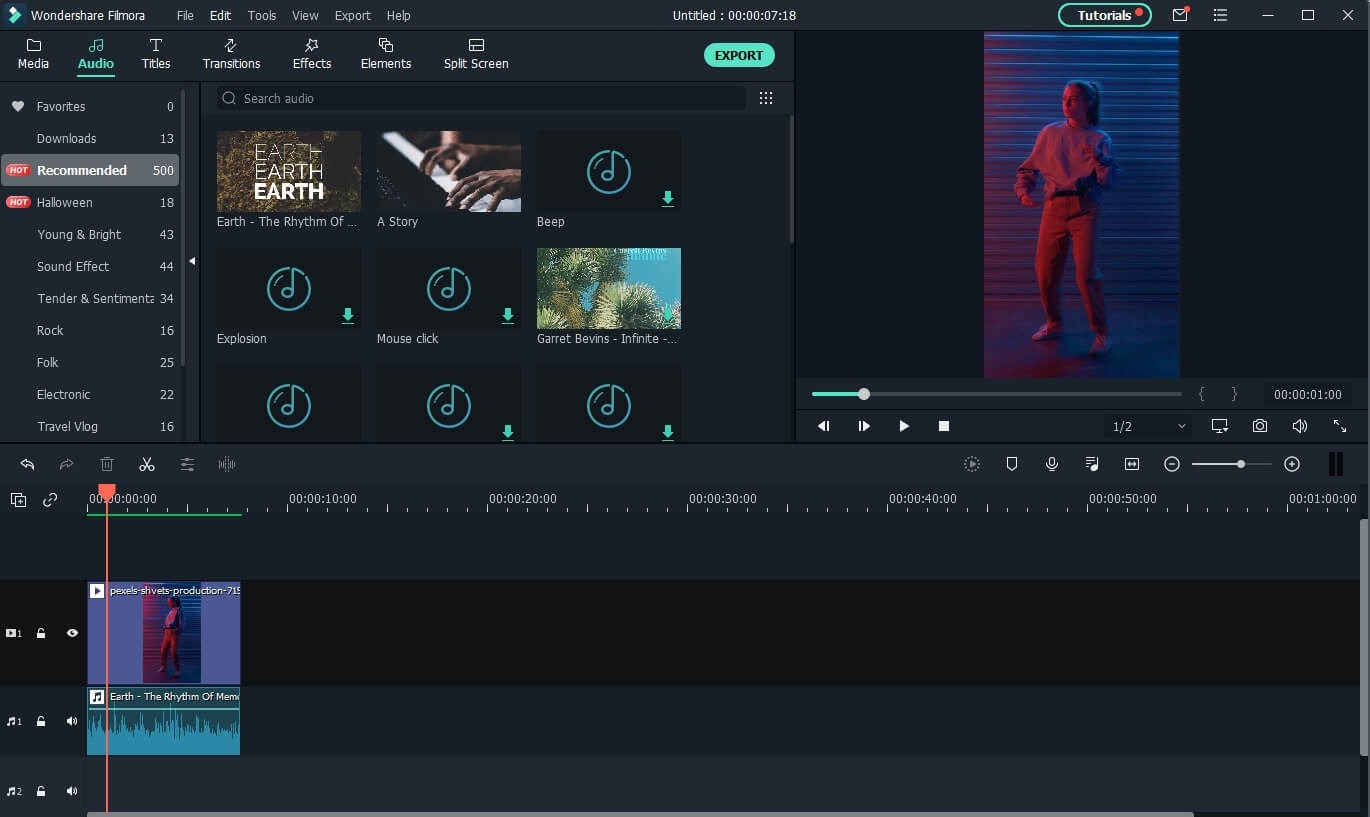
Step 2: Change Your Voice Using the Pitch Option
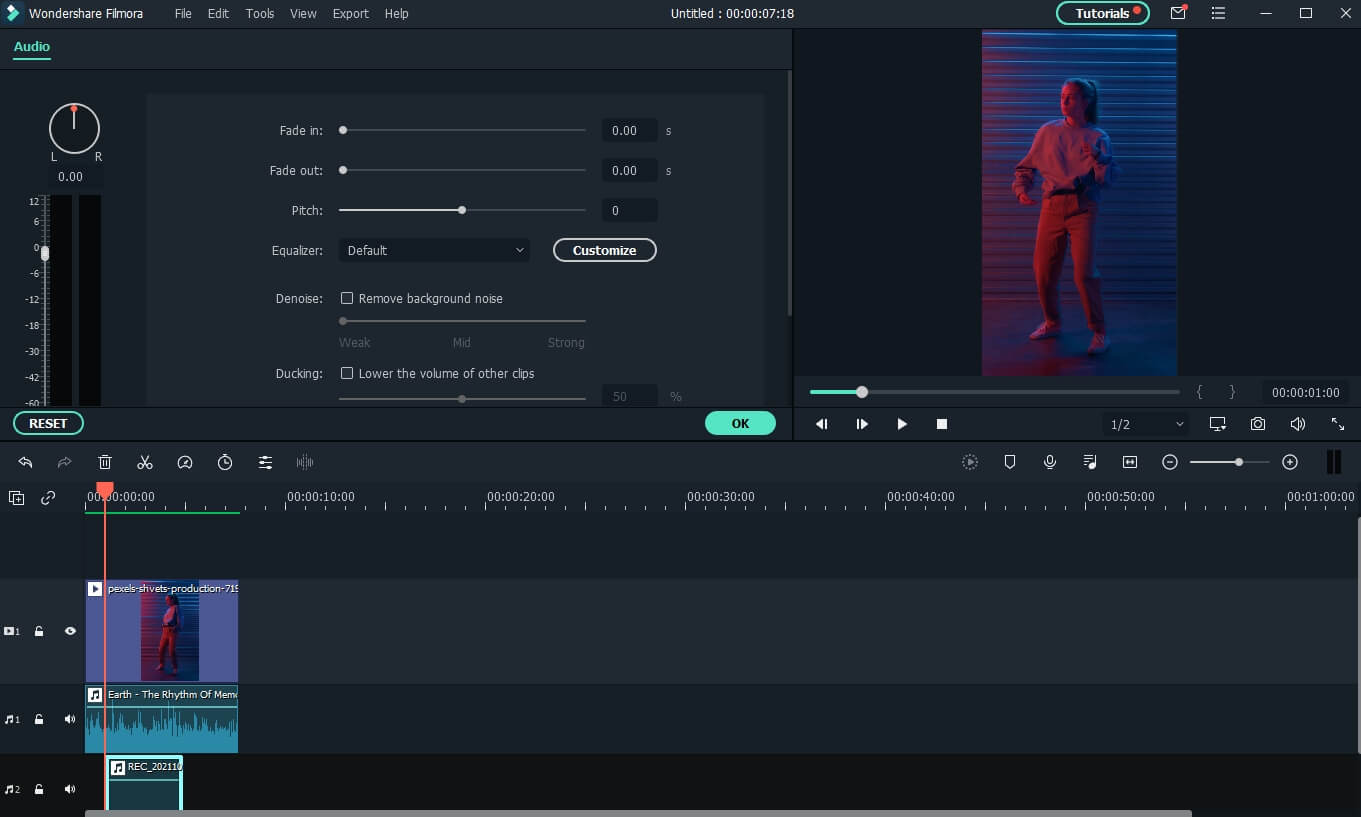
Once you have recorded your voiceover, double click it on the timeline and you will find the audio editing pane which contains several audio editing tools such as fade in and fade out, pitch and denoise. Drag the slide bar on Pitch option to change your voice accordingly. The available values for the Pitch will be from -12 to 12.
Step 3: Export Your Voiceover Video

If you are happy with the voiceover changes that you have made, you can finally click on the export option that you will see towards the bottom right. The edited voiceover video will be saved on your computer.
Conclusion
Voice Effect is a fun filter that has been added to Instagram. If you want to post fun and exciting things on Instagram Stories and Reels, you can definitely try using the Voice Effect filter. Let others enjoy your short video and allow everyone to have a fun Story or Reel watching experience.
02 Types of Instagram Voice Filters
03 Change Voice in Instagram Reel
04 Change Instagram Video Voice on Desktop with Filmora
Part 1: How to Change Your Voice on Instagram Story? [Step by Step]
Before you find out how to use the voice changer for Instagram, you need to first log in to your mobile Instagram account. Once you have done that, go through the steps that we have mentioned below:
Step 1: First, you need to click on your profile picture with the + sign. Once the camera opens up, click on the Story option.
Step 2: You need to browse through the filters and click on the search option, and then search for Voice Effects.
Step 3: You will see the Voice Effects option. The filter icon will be pink. Please click on that. The Voice Effect filter will be added, and then you can start recording a story.
Preview your story, and you will see that your voice has been changed to the chosen Voice Effect. And that’s how you will use the Instagram voice changer filter.
Find out more interesting usage of Instagram Stories .
Part 2: Types of Instagram Voice Filters
There are five voice filters available. Each of them is unique, and depending on your mood and requirements, you can pick a voice filter.
Helium: The first voice filter is helium. It makes your voice sound as if you have inhaled the helium gas. As a result, your voice will sound squishy and cute.
Giant: If you love a giant voice, try the giant voice because it will make you sound completely different!
Vocalist: The vocalist filter makes your voice sound incredibly soothing and melodic. If you like soft voice, this is the filter to go for.
Announcer: The announcer filter will let you speak like a real announcer. It has echo effects too!
Robot: The last one is the robot filter, where you will sound like a robot. This one makes you sound like you are from outer space.
Part 3: How to Change Voice in Instagram Reel?
Just like you can change your voice when filming a story, you can try the same voice-changing filter while recording a reel. Since Reels stay on your account, it makes sense to transform your usual reels into something extraordinary, and the voice changer effect helps you achieve that impeccably. Here’s what you need to do:
Step 1: Go to your Instagram account and click on your profile picture with the + icon. And then click on the Reels option.

Step 2: On your left, you will see the filter option; please click on that. When the filters appear, look at the top of the filters, and you will see a search bar. There, you need to type voice effects.
Step 3: The voice effects filter will appear. Please click on that. Once done, record your reel like you usually do and preview it to listen to your changed voice.

Part 4: How to Change Instagram Video Voice on Desktop with Filmora?
For Win 7 or later (64-bit)
For macOS 10.12 or later
There is another way to change Instagram video voice, and that is by using a trustworthy third-party application like Filmore by Wondershare. This professional video editing tool will let you change your voice efficiently. Furthermore, Filmora ensures to make the entire process of voice change easy and convenient. This means, even if you are not a professional video editor, you can still use Filmora to change your voice just the way you want. Here’s the step that you need to follow:
Step 1: Add Videos with Voiceover or Add a Voiceover to a Video
Launch Wondershare Filmora on your desktop, and then click the New Project to start a new one. Next, click on the import option to add the video/audio file. Or you can use the music tracks in the Audio library.

Filmora also allows you to record voiceover and change the voice later, you can click on the voiceover option that you can see above the Timeline.
Step 2: Change Your Voice Using the Pitch Option
Once you have recorded your voiceover, double click it on the timeline and you will find the audio editing pane which contains several audio editing tools such as fade in and fade out, pitch and denoise. Drag the slide bar on Pitch option to change your voice accordingly. The available values for the Pitch will be from -12 to 12.
Step 3: Export Your Voiceover Video
If you are happy with the voiceover changes that you have made, you can finally click on the export option that you will see towards the bottom right. The edited voiceover video will be saved on your computer.
Conclusion
Voice Effect is a fun filter that has been added to Instagram. If you want to post fun and exciting things on Instagram Stories and Reels, you can definitely try using the Voice Effect filter. Let others enjoy your short video and allow everyone to have a fun Story or Reel watching experience.
02 Types of Instagram Voice Filters
03 Change Voice in Instagram Reel
04 Change Instagram Video Voice on Desktop with Filmora
Part 1: How to Change Your Voice on Instagram Story? [Step by Step]
Before you find out how to use the voice changer for Instagram, you need to first log in to your mobile Instagram account. Once you have done that, go through the steps that we have mentioned below:
Step 1: First, you need to click on your profile picture with the + sign. Once the camera opens up, click on the Story option.
Step 2: You need to browse through the filters and click on the search option, and then search for Voice Effects.

Step 3: You will see the Voice Effects option. The filter icon will be pink. Please click on that. The Voice Effect filter will be added, and then you can start recording a story.
Preview your story, and you will see that your voice has been changed to the chosen Voice Effect. And that’s how you will use the Instagram voice changer filter.
Find out more interesting usage of Instagram Stories .
Part 2: Types of Instagram Voice Filters
There are five voice filters available. Each of them is unique, and depending on your mood and requirements, you can pick a voice filter.
Helium: The first voice filter is helium. It makes your voice sound as if you have inhaled the helium gas. As a result, your voice will sound squishy and cute.
Giant: If you love a giant voice, try the giant voice because it will make you sound completely different!
Vocalist: The vocalist filter makes your voice sound incredibly soothing and melodic. If you like soft voice, this is the filter to go for.
Announcer: The announcer filter will let you speak like a real announcer. It has echo effects too!
Robot: The last one is the robot filter, where you will sound like a robot. This one makes you sound like you are from outer space.
Part 3: How to Change Voice in Instagram Reel?
Just like you can change your voice when filming a story, you can try the same voice-changing filter while recording a reel. Since Reels stay on your account, it makes sense to transform your usual reels into something extraordinary, and the voice changer effect helps you achieve that impeccably. Here’s what you need to do:
Step 1: Go to your Instagram account and click on your profile picture with the + icon. And then click on the Reels option.
 DEX 3 RE is Easy-To-Use DJ Mixing Software for MAC and Windows Designed for Today’s Versatile DJ.
Mix from your own library of music, iTunes or use the Pulselocker subsciprtion service for in-app access to over 44 million songs. Use with over 85 supported DJ controllers or mix with a keyboard and mouse.
DEX 3 RE is everything you need without the clutter - the perfect 2-deck mixing software solution for mobile DJs or hard-core hobbiests.
PCDJ DEX 3 RE (DJ Software for Win & MAC - Product Activation For 3 Machines)
Step 2: On your left, you will see the filter option; please click on that. When the filters appear, look at the top of the filters, and you will see a search bar. There, you need to type voice effects.
Step 3: The voice effects filter will appear. Please click on that. Once done, record your reel like you usually do and preview it to listen to your changed voice.

Part 4: How to Change Instagram Video Voice on Desktop with Filmora?
For Win 7 or later (64-bit)
For macOS 10.12 or later
There is another way to change Instagram video voice, and that is by using a trustworthy third-party application like Filmore by Wondershare. This professional video editing tool will let you change your voice efficiently. Furthermore, Filmora ensures to make the entire process of voice change easy and convenient. This means, even if you are not a professional video editor, you can still use Filmora to change your voice just the way you want. Here’s the step that you need to follow:
Step 1: Add Videos with Voiceover or Add a Voiceover to a Video
Launch Wondershare Filmora on your desktop, and then click the New Project to start a new one. Next, click on the import option to add the video/audio file. Or you can use the music tracks in the Audio library.
Filmora also allows you to record voiceover and change the voice later, you can click on the voiceover option that you can see above the Timeline.

Step 2: Change Your Voice Using the Pitch Option
 The BootIt Collection covers multi-booting, partitioning, and disk imaging on traditional PC’s using the standard BIOS and newer PC’s using UEFI. The collection includes BootIt Bare Metal (BIBM) for standard BIOS systems and BootIt UEFI (BIU) for UEFI system.
Once you have recorded your voiceover, double click it on the timeline and you will find the audio editing pane which contains several audio editing tools such as fade in and fade out, pitch and denoise. Drag the slide bar on Pitch option to change your voice accordingly. The available values for the Pitch will be from -12 to 12.
Step 3: Export Your Voiceover Video
 vMix 4K - Software based live production. vMix 4K includes everything in vMix HD plus 4K support, PTZ control, External/Fullscreen output, 4 Virtual Outputs, 1 Replay, 4 vMix Call, and 2 Recorders.
If you are happy with the voiceover changes that you have made, you can finally click on the export option that you will see towards the bottom right. The edited voiceover video will be saved on your computer.
Conclusion
Voice Effect is a fun filter that has been added to Instagram. If you want to post fun and exciting things on Instagram Stories and Reels, you can definitely try using the Voice Effect filter. Let others enjoy your short video and allow everyone to have a fun Story or Reel watching experience.
02 Types of Instagram Voice Filters
03 Change Voice in Instagram Reel
04 Change Instagram Video Voice on Desktop with Filmora
Part 1: How to Change Your Voice on Instagram Story? [Step by Step]
Before you find out how to use the voice changer for Instagram, you need to first log in to your mobile Instagram account. Once you have done that, go through the steps that we have mentioned below:
Step 1: First, you need to click on your profile picture with the + sign. Once the camera opens up, click on the Story option.
.png) Kanto Player Professional
Kanto Player Professional
Step 2: You need to browse through the filters and click on the search option, and then search for Voice Effects.
Step 3: You will see the Voice Effects option. The filter icon will be pink. Please click on that. The Voice Effect filter will be added, and then you can start recording a story.
Preview your story, and you will see that your voice has been changed to the chosen Voice Effect. And that’s how you will use the Instagram voice changer filter.
Find out more interesting usage of Instagram Stories .
Part 2: Types of Instagram Voice Filters
There are five voice filters available. Each of them is unique, and depending on your mood and requirements, you can pick a voice filter.
Helium: The first voice filter is helium. It makes your voice sound as if you have inhaled the helium gas. As a result, your voice will sound squishy and cute.
Giant: If you love a giant voice, try the giant voice because it will make you sound completely different!
Vocalist: The vocalist filter makes your voice sound incredibly soothing and melodic. If you like soft voice, this is the filter to go for.
Announcer: The announcer filter will let you speak like a real announcer. It has echo effects too!
Robot: The last one is the robot filter, where you will sound like a robot. This one makes you sound like you are from outer space.
Part 3: How to Change Voice in Instagram Reel?
Just like you can change your voice when filming a story, you can try the same voice-changing filter while recording a reel. Since Reels stay on your account, it makes sense to transform your usual reels into something extraordinary, and the voice changer effect helps you achieve that impeccably. Here’s what you need to do:
Step 1: Go to your Instagram account and click on your profile picture with the + icon. And then click on the Reels option.
Step 2: On your left, you will see the filter option; please click on that. When the filters appear, look at the top of the filters, and you will see a search bar. There, you need to type voice effects.
Step 3: The voice effects filter will appear. Please click on that. Once done, record your reel like you usually do and preview it to listen to your changed voice.
Part 4: How to Change Instagram Video Voice on Desktop with Filmora?
For Win 7 or later (64-bit)
For macOS 10.12 or later
There is another way to change Instagram video voice, and that is by using a trustworthy third-party application like Filmore by Wondershare. This professional video editing tool will let you change your voice efficiently. Furthermore, Filmora ensures to make the entire process of voice change easy and convenient. This means, even if you are not a professional video editor, you can still use Filmora to change your voice just the way you want. Here’s the step that you need to follow:
Step 1: Add Videos with Voiceover or Add a Voiceover to a Video
Launch Wondershare Filmora on your desktop, and then click the New Project to start a new one. Next, click on the import option to add the video/audio file. Or you can use the music tracks in the Audio library.
Filmora also allows you to record voiceover and change the voice later, you can click on the voiceover option that you can see above the Timeline.
Step 2: Change Your Voice Using the Pitch Option
Once you have recorded your voiceover, double click it on the timeline and you will find the audio editing pane which contains several audio editing tools such as fade in and fade out, pitch and denoise. Drag the slide bar on Pitch option to change your voice accordingly. The available values for the Pitch will be from -12 to 12.
Step 3: Export Your Voiceover Video
 ZoneAlarm Pro Antivirus + Firewall NextGen
If you are happy with the voiceover changes that you have made, you can finally click on the export option that you will see towards the bottom right. The edited voiceover video will be saved on your computer.
Conclusion
Voice Effect is a fun filter that has been added to Instagram. If you want to post fun and exciting things on Instagram Stories and Reels, you can definitely try using the Voice Effect filter. Let others enjoy your short video and allow everyone to have a fun Story or Reel watching experience.
- Title: [Updated] Unlocking Personalized Vocal Elements on Instagram
- Author: Nova
- Created at : 2024-07-25 19:18:13
- Updated at : 2024-07-26 19:18:13
- Link: https://instagram-videos.techidaily.com/updated-unlocking-personalized-vocal-elements-on-instagram/
- License: This work is licensed under CC BY-NC-SA 4.0.